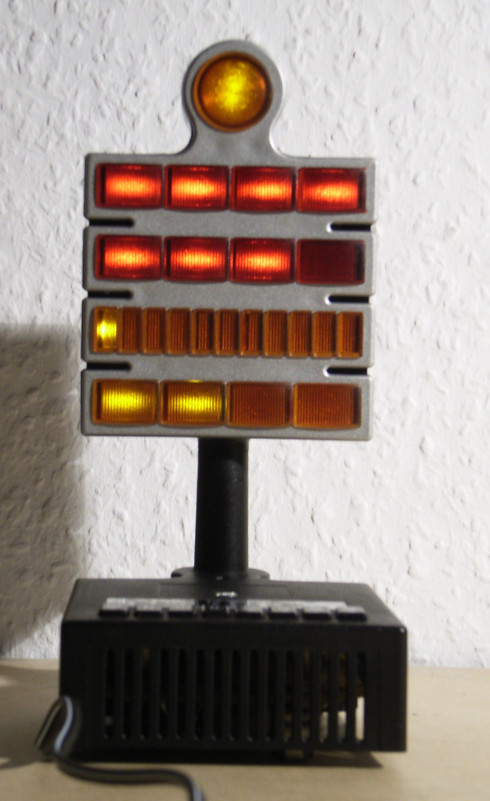
 The “Berlin Clock”
also called “set theory clock” or “Mengenlehre-Uhr” in German.
The time is displayed by the count of illuminated fields, weighted by their value:
– lower row: 0 to 4 fields indicating 0 to 4 minutes PLUS
– 2nd row: 0 to 11 fields indicating (0..11) * 5 minutes = 0 to 55 minutes PLUS
– 3rd row: 0 to 4 fields indicating 0 to 4 hours PLUS
– upper row: 0 to 4 fields indicating (0..4) * 5 hours = 0 to 20 hours
The round field on top is illuminated for every other second. Additional, small LEDs in the top field show whether an alarm is set and activated.
The time shown on the photo?
4*5h + 3*1h + 1*5m + 2*1m = 23:07
History
The Berlin Clock was designed by Dieter Binninger in 1975. Some information can be found on Wikipedia: https://en.wikipedia.org/wiki/Mengenlehreuhr
Small table top models were sold by souvenir shops in the 1980s, as well as a wall clock. All of those suffer from the amount of heat generated by the transformer(s) – 1 for the table version, 3 for the wall clock – which makes the plastic brittle. To save or restore a Berlin Clock, it is highly advised to remove the transformer and use a wall-wart type power supply which is easily possible with the circuit introduced below. It can even recover a clock with a defective processor, which was a 4 bit controller with mask ROM made by Texas Instruments.
While the table version already used LEDs, the wall clock had miniature incandescent lamps, therefore the need of three transformers. I have modified a wall clock by installing high efficiency TOPLEDs in place of the lamps, effectively eliminating two of the three transformers and reducing the heat.
The Circuit
My circuit replaces the custom micro controller, the LED driver ICs and the whole power supply circuit board. I used an Atmel ATmega8 CPU which drives the LEDs by discrete PNP transistors for the high side and a ULN2003 array for the low side. The LED circuit board can remain in the original state; the 14 way DIP connector fits directly in the socket on the replacement board. I recommend to replace the old, not very efficient LEDs by modern high-efficiency types though. As for the original, the time base is derived from the mains frequency. Therefore the current firmware requires the clock to be run from a 50 Hz mains with a high long-time precision. The circuit board with the processor and driver ICs carries the contacts of the push buttons as well, so I suggest to remove all parts but the diodes shown in the photo below from the board and re-use it. 6 wires need to be soldered to the locations of the processor’s place as indicated in the circuit diagram.

Emptied original PCB with the 6 wires for the switch matrix attached. 3 diodes and 1 jumper wire remain in place, the other components need to be removed.
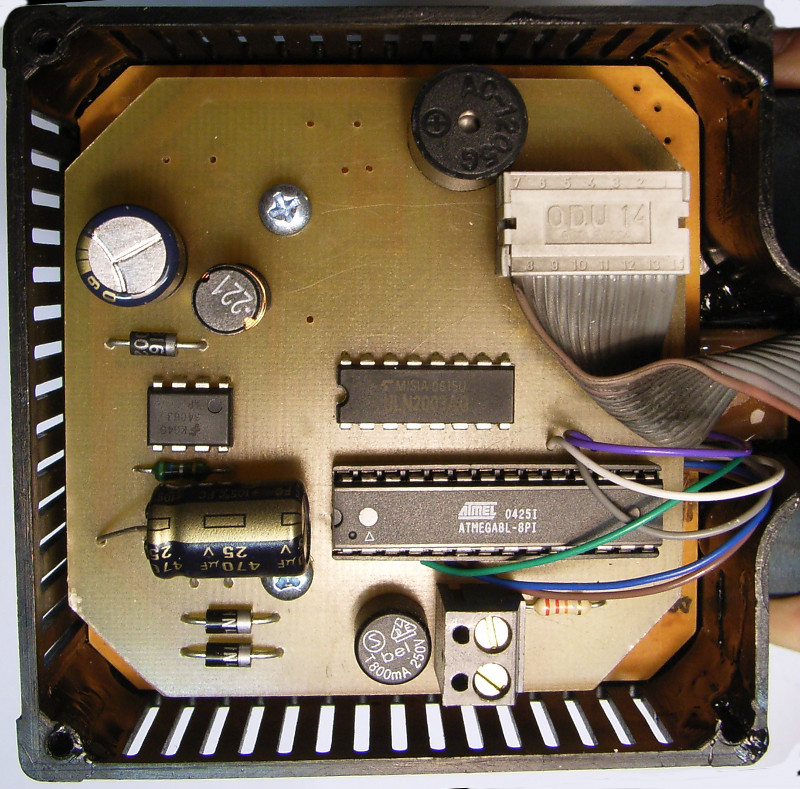
Replacement circuit fitted to the clock case. The 14 way connector from the LED board fits to the socket on the PCB. The screw terminal on the bottom connects to an AC wall-wart type power supply delivering 12v AC, current consumption is well below 200mA thanks to the used switching regulator which provides the 5 volts for the micro controller and LEDs. The speaker on top is a dynamic loudspeaker, no piezo, and without integrated electronics, with a DC resistance of about 50 ohms.
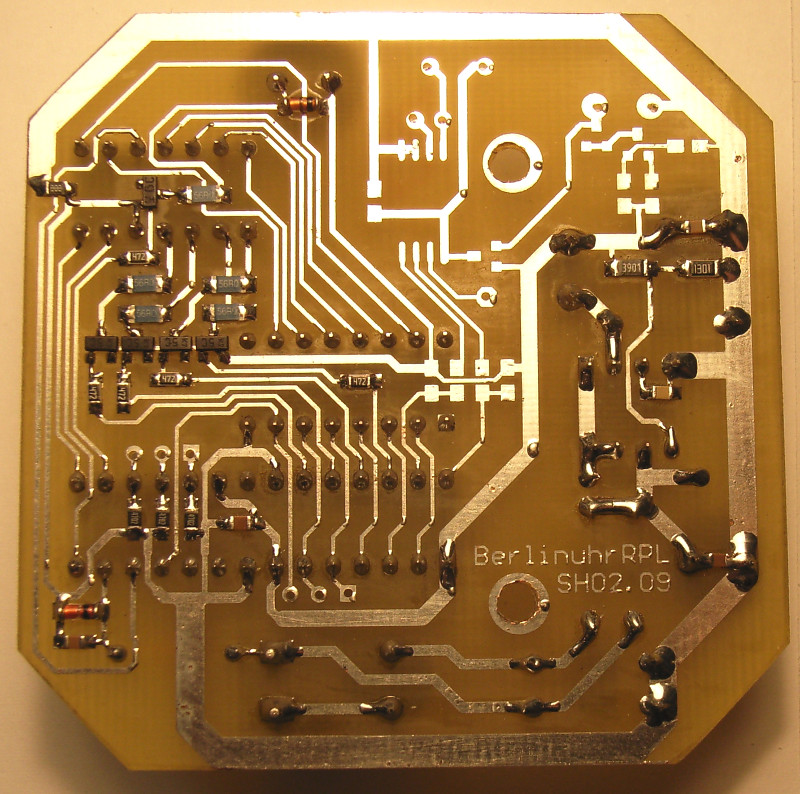
Solder side view – some SMD components are in use, capacitors and small resistors are size 0805, the resistors above the MC34063 on the right and the 4 56ohms resistors for the LEDs are size 1206. The unpopulated locations are reserves for a PCF8583 I²C real time clock circuit which would make the Berlin Clock independent from line frequency and preserve the time during mains outage. This function is not yet implemented in the current firmware. If anyone feels free to add it, please ask for the C code (WinAVR/AVR-GCC).
Firmware
The software is written in C (AVR-GCC). As written above, the current version uses the mains frequency of 50Hz as a timebase and makes no use of the RTC chip provided on the PCB layout. All functions of the clock have been programmed to resemble the original behaviour. The wrap-around at midnight works exactly as in the original: 23:59 -> 24:00 -> 00:01.
Downloads
This project is free under the terms of the Creative Commons by-nc-sa licence (use and alter it for non-commercial purposes provided my name remains in the work).
The files needed to produce the PCB, build the circuit and program the micro controller can be downloaded here:
berlinuhr_schematic PDF file of the schematic diagram
berlinuhr_pcb PDF file of the PCB layout (size 100% when printed on A4)
berlinuhr_cam ZIP archive of CAM files (Gerber for solder side copper and solder mask plus drill file) for industrial PCB production
berlinuhr_firmware ZIP archive with hex file for programming the Atmel ATmega8 micro controller.
Make sure you set (write a “0”) the following fuse bits when programming: SUT0, CKSEL2, CKSEL3 and BODEN. All others should be unset (remain “1”).